Navigation Tabs

about
disclosurecontact

January 11, 2013

green grinch cookies.


I got the recipe for these cookies from The Tasty Kitchen right before Christmas, and they were an absolute hit! They're soft and cakey and really really delicious. The green color makes them really fun and festive too :)

I'm a huge fan of any kind of really cakey cookie, especially with milk, so this is definitely a recipe I'll be making over and over, probably all different colors for different occasions!
// 6 Tbsp. butter
// 1 cup powdered sugar
// 1 tsp. cornstarch
// 1 box yellow cake mix
// 2 eggs
// approx. 10-15 drops of green food dye

1. Mix the powdered sugar and cornstarch together in a shallow dish to coat the cookie dough in later.
2. Mix together the butter, cake mix, and eggs.
3. Stir in the green food dye after everything is combined.
4. Drop balls of the batter into the dish with powdered sugar and roll through before placing on the greased cookie sheet. Using two spoons for this part is recommended because the cookie dough is really sticky to roll with your fingers.
5. Bake for 8-10 minutes at 375 degrees. When the time's up they won't look finished because they're all puffy and gooey, but once they cool they'll shrivel up a little bit and set.
These cookies are perfect for any Christmas party - or for a quiet night in with friends! Enjoy them!

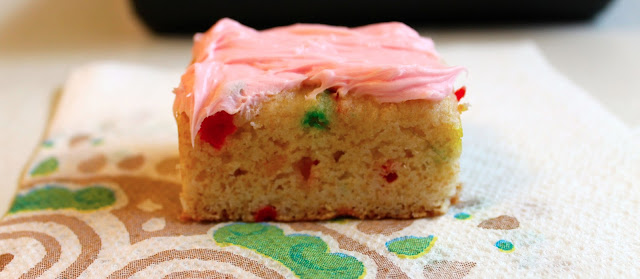
funfetti blondie bars.

These gooey funfetti bars are the kind of 'you have to eat it to understand'. In a picture it just looks like a square cupcake, but in your mouth it's a gooey, chewy, delicious blondie bar.// 1 box funfetti cake mix
// ¼ cup veggie oil
// ½ cup milk
// sprinkles (optional, for tops)
// frosting (I cheated, but there are some great frosting recipes out there!)
1. Combine the cake mix, oil, and egg.
2. Add the milk slowly, the batter needs to remain dense to get that ooey gooey texture after baking.
3. Bake for 20-25 minutes at 350 degrees in a non stick pan. I use a perfect brownie pan set whenever I make cakey/brownie ish things like this because the slices are all ready to go after baking.
4. Let them sit for about 20 minutes and frost when cooled!
5. Squeeze as much funfetti goodness into your mouth at once as possible.

All in a day's work.

January 9, 2013

DIY custom mugs.

Big surprise here, another Pinterest success!! But this particular success has turned into a little bit of a money maker. I saw this idea of writing on mugs with a glass/ceramic marker and decided to make some for my boyfriend for Christmas because he lives on tea and coffee. Everyone who received them and saw them get opened told me that I should sell them because they're so cute, so on a whim I decided to put them on Etsy to make some extra cashmonayy. Check them out here!
I made him all four of the ones above, even though one's for me, but he took that home so I have a mug at his house (easy way to gift something to yourself in that way)! These mugs are really easy to make, as long as you have a steady hand and some (read: tons of) patience.
I got a glass paint marker (which comes in a few different colors) and mugs from IKEA for $2.99 each. They are a little pricier, you can get ones for a dollar, but I wanted them to be a little bigger and not as rounded so that it would be easier to write on.All you have to do is draw/write your design right onto the face of the mug. Depending on the marker you use, the following directions might vary (I know you can use a sharpie too, but not sure if the mug is dishwasher safe that way). After finishing the writing, let the mug sit and dry for 4-8 hours, then bake for 40 minutes at 375*. After that the mug should be dishwasher safe if you did everything correctly and got the times right (though I honestly recommend hand washing just to really make sure that the design stays looking fresh).
I really love this type of project that has a real purpose and love pinterest for organizing tons of these in one space for me. Amen.

DIY quote canvas.

I saw this project a few different times on Pinterest, and the pin I saw from A Beautiful Mess is what finally made me do it. I made this one for my boyfriend for Christmas, and he loved it. It was so easy to make, and the words that I chose are from "Everything Has Changed" by Taylor Swift ft. Ed Sheeran, favorite artists that we both share. I thought it would be awesome for him to put in his kind of empty house to remind him of me since we live so far away from each other.
I chose for my background to be old pages of a book because it's what I had on hand (it was the preview of the author's next book from the back, no biggie). I've seen it done with photographs, paintings, and more, but I thought the pages would be a nice neutral that wouldn't take too much away from the quote's letters.

First, mod podge your background on to the canvas, unless you're using a painting or something that is already finished and ready to go. I applied a thin layer of mod podge under and on top of the pages, and waited for them to dry.
Then I applied the vinyl letter stickers. However, this is where I noticed I had a problem. There were a few bumps and ridges from the pages getting wet and then drying, so make sure you smooth everything out as best as you can or the paint will find it's way underneath the letters. Another alternative to mod podge is spray adhesive, which usually doesn't make the pages wrinkle (hindsight is 20/20).

I used a light coating of paint (similar) over the letters with a foam brush and worked the paint around to all of the edges. After it was completely covered I applied a second coat to make a darker red.
After the paint dries, you can peel off the letters, and if everything went as planned, you'll have a clear quote on your canvas. It's a really quick and easy project and the best part is, it is a cheap gift idea. And even though the vinyl letters get paint all over them, they are definitely reusable because they stay sticky, bonusss.